User Guide
Welcome to Smartfarm! This platform enables you to monitor your crops and control your farm environment from anywhere in the world.
To begin your smart farming journey, follow these core steps:
- 1 Create a Project: Define what you want to monitor (e.g., "Tomato Greenhouse").
- 2 Register Devices: Assign hardware kits to your account.
- 3 Connect & Sync: Link your physical devices to your project.

Project Setup
Step 1: New Project
Navigate to Projects > Create Project. Enter a name and select the components you plan to use (DHT, Soil Moisture, etc.).
Step 2: Notifications
Configure how you want to be alerted. We support Email and SMS notifications. You can set custom threshold triggers for each sensor during creation or later via the dashboard.
Monitoring & Remote Control
The My Projects dashboard provides live visualization of your farm parameters:
- Soil Moisture: Keep track of root-zone hydration levels.
- Temperature & Humidity: Monitor ambient environmental conditions.
- Irrigation Status: See when your pumps are active.
- Weather Forecast: View 5-day forecasts tailored to your farm's region.
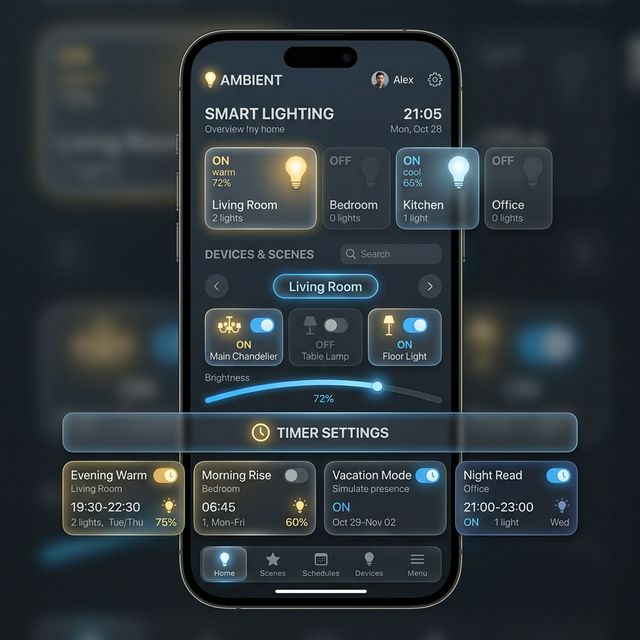
Control your farm lighting remotely through our dedicated Smart Lighting widget. You can toggle bulbs instantly or set advanced timers.
Developer API Guide
Smartfarm provides a robust REST API for developers to integrate their own hardware kits or third-party applications.
All API requests must include a valid API Key and Project ID. You can find these in your Project Settings.
                        Authorization: Bearer YOUR_API_KEY

                        X-Project-ID: YOUR_PROJECT_ID

Get Latest Sensor Data
GET /api/fetch-new-dht-data?project_id={id}
Update Thresholds
POST /api/dht-threshold-update
Payload:
{ "project_id": 123, "temp_threshold_val": 30 }
Kit & Device Integration
To set up your official Smartfarm Kit (ESP32-based):
- Flash the latest firmware provided in our GitHub Repository.
- Enter your Wi-Fi credentials and Device ID in the configuration file.
- The device will automatically connect to our MQTT broker and begin transmitting.